Travelbug Sync
Learn how to sync your trips between devices.
Requirements
- Both devices must be signed into the same Apple Id.
- The Apple Id must have a valid Travelbug subscription.
Getting started
Travelbug uses iCloud to store your trip data on Apple’s servers.
The trips that are stored locally on the device are shown in the trips view - tap on the green cloud icon to open the iCloud trips view.
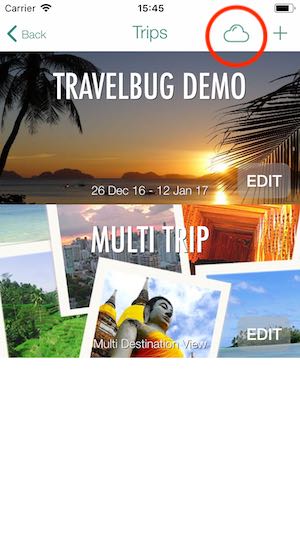
The iCloud trips view shows the trips that are stored in iCloud. If a trip has a white cloud icon on it, that means there is not a local copy on the device - tap the icon to download a copy. That trip will then appear in the trips view.

To upload a trip to iCloud, tap on it in the trips view so that it appears in the dashboard view. Then you can tap the white cloud icon to upload it, and it will appear in the iCloud trips view.
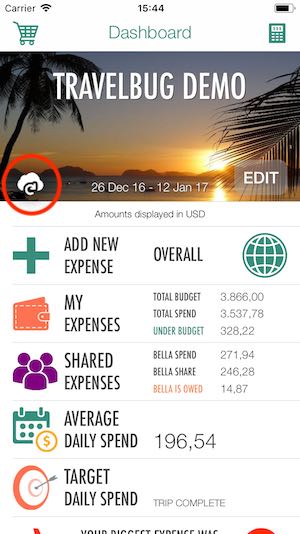
Once a trip has been uploaded to iCloud, when you make some changes to it tap the white cloud on the dashboard. That will add any changes from that device, and also fetch any changes that have been made to the iCloud copy by other devices.
The main thing to remember is that you need to tell the app to sync, it doesn’t do it automatically in the background. That’s deliberate - when you’re travelling you might well find yourself with a slow connection, no connection, expensive data or a low data allowance on a local sim, all of which can be problematic if your apps are trying to sync in the background.
Example
So you have started a trip on your iPhone, and you want to sync it with your iPad:
- On the iPhone, select the trip you wish to sync so that it appears on the dashboard view.
- Tap the white cloud icon.
- On the iPad, navigate to the iCloud trips view. The new trip should appear there with a white cloud icon.
- Tap the white cloud icon on the iPad, then tap back to return to the trips view, where the local copy of the new trip will be. Tap on the new trip to select it so it appears on the dashboard view of the iPad.
- Back on the iPhone, make some changes - you can add, edit, or delete expenses, destinations, etc
- Tap the white cloud icon on the iPhone dashboard to sync those changes with iCloud
- Then tap the white cloud icon on the iPad to fetch those changes from iCloud to the iPad.
- Now when you make some further changes on the iPad, tapping the white cloud icon will update iCloud with the
Managing your trips
If you have two devices like the above example, you will have a local copy of your trip on each device and a further remote copy in iCloud. You can delete a local copy in the trips view by swiping left on the trip and tapping the red delete buttton. This will not affect the iCloud copy, so you can always download it again.
Likewise, you can delete the trip from iCloud in the iCloud trips view by swiping left and tapping the red delete button. The local copy is not affected.
If you only have one device, you can still use the sync to keep a copy of your data in iCloud for backup purposes should you want to transfer it to a new device.